Unlock Document Intelligence: Building a File Q&A App with NextJS, UploadThing, and LlamaIndex
In this article, we build a simple Q&A app that allows users to upload files and ask questions about their content. We create a Next.js project, integrate UploadThing, a vector database, and OpenAI.
By the end, we have an application where users can upload and query documents. The uploaded documents are publicly available so all users can access every uploaded document.
Throughout this article, we cover the following key points:
- Creating a Next.js project for a Q&A app that enables users to upload and query documents
- Integrating UploadThing for efficient file handling and storage
- Implementing Qdrant as a vector database for fast document querying
- Using OpenAI and LlamaIndex for natural language processing and document indexing
- Developing a chat API with streaming capabilities for real-time responses
- Building a simple frontend using Shadcn UI components
This application serves as a foundation for more advanced document analysis and querying systems, offering potential for further customization and feature expansion.
You can find the code repo for this article here
Upload files to UploadThings
In the first section, we create the Next.js app and integrate UploadThing by following the official documentation.
Creating the Next.js project
Next.js is a React framework for building full-stack web applications. You use React Components to build user interfaces, and Next.js for additional features and optimizations.
Let’s create a new Next.js app with App router and the default config options.
npx create-next-app@latest
And that’s it, if you navigate to the created folder, you can see the folders and files that was created by the Next.js cli. Type npm run start and the app is ready on your localhost.
Installing UploadThing
UploadThing is a wrapper around S3 that offers additional features. We’ve chosen it for its seamless integration with Next.js and its simpler setup compared to AWS infrastructure.
npm install uploadthing @uploadthing/react💡 The project uses the 7.x version which was released just recently.UploadThing is a cloud service, so you need to create an account and generate a key to upload files from the project.
UploadThing has a free plan to start which is completely enough for the goal of this tutorial. Copy your token from the dashboard and create a .env file with these variables.
Upload file API route
Now let’s create an API route in our Next.js project that we can use to upload files. In our first version, we can upload only PDF files that are smaller or equal to 4MB. After a successful upload, the endpoint returns with the file URL.
// app/api/upload/route.ts

import { createRouteHandler, createUploadthing, type FileRouter as UploadThingFileRouter } from "uploadthing/next";

const f = createUploadthing();

export const fileRouter: UploadThingFileRouter = {
  fileUploader: f({ pdf: { maxFileSize: "4MB" } }).onUploadComplete(async ({ file }) => ({
    success: true,
    url: file.url,
  })),
};

export const { GET, POST } = createRouteHandler({
  router: fileRouter,
});

export type FileRouter = typeof fileRouter;
UploadThing Components
First, add the UploadThing tailwind config wrapper to our tailwind.config.ts file.
// tailwind.config.ts

import type { Config } from "tailwindcss";
import { withUt } from "uploadthing/tw";

const config: Config = withUt({
  ...
});

export default config;
Then let’s create the upload React component based on the UploadThing Button component. Don’t forget to overwrite the default URL config if your file upload API path is not api/uploadthing .
// components/ui/upload-button.tsx

"use client";

import { generateUploadButton } from "@uploadthing/react";
import { FileRouter } from "@/app/api/upload/route";

const UploadThingButton = generateUploadButton<FileRouter>({ url: "/api/upload" });

export const UploadButton = () => {
  return (
    <UploadThingButton
      endpoint="fileUploader"
      content={{
        button: "Upload File",
      }}
      onClientUploadComplete={(res) => {
        console.log("Files: ", res);
        alert("Upload Completed");
      }}
      onUploadError={(error: Error) => {
        alert(`ERROR! ${error.message}`);
      }}
    />
  );
};
// app/page.tsx
import { UploadButton } from "@/components/ui/upload-button";
export default function Home() {
return (
<div className="grid min-h-screen grid-rows-[20px_1fr_20px] items-center justify-items-center gap-16 p-8 pb-20 font-[family-name:var(--font-geist-sans)] sm:p-20">
<main className="row-start-2 flex flex-row items-center gap-8 sm:items-start">
<UploadButton />
</main>
</div>
);
}As you can see, this upload button is a client-side component, so Next.js renders this only on the client side. Add the SSR plugin to the root layout file, to avoid unnecessary loading state.
// app/layout.tsx

import { NextSSRPlugin } from "@uploadthing/react/next-ssr-plugin";
import { extractRouterConfig } from "uploadthing/server";

import { fileRouter } from "./api/upload/route";

...

export default function RootLayout({
  children,
}: Readonly<{
  children: React.ReactNode;
}>) {
  return (
    <html lang="en">
      <NextSSRPlugin routerConfig={extractRouterConfig(fileRouter)} />
      <body className={`${geistSans.variable} ${geistMono.variable} antialiased`}>{children}</body>
    </html>
  );
}
Now, if you navigate to http://localhost:3000, you’ll see the basic UI of our file upload page. Try uploading your first file. If everything is set up correctly, you’ll see the uploaded file in your UploadThing dashboard.
Next, let’s create components to list the uploaded files on our site. To retrieve this list, we’ll create a server action using the UploadThing UTApi.
// lib/file-upload/api-client.ts

"use server";

import { UTApi } from "uploadthing/server";

const utapi = new UTApi();

export const listFiles = async () => {
  const files = await utapi.listFiles();
  return files;
};
💡 The `listFiles` method must be a server action, you can’t run it from your client components!Next, we'll create a React component to call the function and render the list. This server component allows us to fetch and display the list easily. However, it's important to note that we can't add client-side-only functionality like hooks to this component, nor can we nest it within a client component.
// components/file-list.tsx

import { listFiles } from "@/lib/file-upload/api-client";

export const FileList = async () => {
  const { files } = await listFiles();

  return (
    <div className="flex h-[50vh] flex-col gap-4">
      <p>Uploaded Files</p>
      <div className="flex flex-col gap-2">
        {files.map((file) => (
          <div key={file.key}>{file.name}</div>
        ))}
      </div>
    </div>
  );
};
Great! We’ve successfully implemented file uploads to storage and created a frontend list of these files. Our next task is to generate vector embeddings from the file content and store them in a vector database. This step enables us to build a Retrieval-Augmented Generation (RAG) system for our Q&A application.
Store embeddings in Qdrant
Now let’s set up the necessary accounts and connect the vector store to our application using LlamaIndex. LlamaIndex is a powerful tool that streamlines file processing, embedding generation, vector storing, and prompting. It abstracts away the complex tasks, allowing us to simply call LlamaIndex functions in the application.
Creating an OpenAI account
In our example, we use OpenAI by default. With LlamaIndex you can easily switch to another LLM provider or to a local model to reduce cost or increase privacy. LlamaIndex’s flexibility allows you to integrate various language models, including open-source options or your own fine-tuned models. This adaptability not only helps in managing costs but also enables you to change the system to your specific needs and performance requirements.
To use OpenAI, you’ll need to get an OpenAI API key and then make it available as an environment variable this way:
// .env
OPENAI_API_KEY = "sk-proj-...";
LlamaIndex uses OpanAI by default, so we don’t need to use this environment variable directly in our code base if we use the OPENAI_API_KEY name as our environment variable.
Creating a Qdrant account
Qdrant is an AI-native vector dabatase and a semantic search engine. You can use it to extract meaningful information from unstructured data.
Create a new Qdrant cluster and add the generated API key and cluster URL to your .env file, similar to the OpenAI API key before.
// .env
QDRANT_API_KEY = "...";
QDRANT_URL = "...";
Generating embeddings with LlamaIndex
First, let's install LlamaIndex in the project with npm.
npm install llamaindexUpdate your next.config.mjs file and add the LlamaIndex plugin to it.
import withLlamaIndex from "llamaindex/next";

/** @type {import('next').NextConfig} */
const nextConfig = withLlamaIndex({});

export default nextConfig;
In this post, we implement a simplified process: uploading files to UploadThing storage, generating embeddings from these files, and storing them in the Qdrant vector store. We won't dig deeply into error handling or data inconsistency issues here. It's worth noting though, that this implementation could lead to inconsistent states, for instance, if a file uploads successfully to UploadThing but the embedding generation fails. To cover such scenarios, we'd need to develop a process (either automated or semi-automated) to handle these inconsistencies.
The embedding generation is part of our AI functionality implementations, let’s create a new folder under the lib folder.
The getDocuments method load the file from a URL and convert it to llamaindex documents.
// lib/ai-engine/loader.ts

import type { Document, Metadata } from "llamaindex";
import { PDFReader } from "llamaindex/readers/PDFReader";

export const getDocuments = async (fileUrl: string): Promise<Document<Metadata>[]> => {
  const reader = new PDFReader();
  const uploadedData = await fetch(fileUrl);

  if (!uploadedData.ok) {
    throw new Error("Failed to fetch file");
  }

  const content = await uploadedData.arrayBuffer();

  const documents = await reader.loadDataAsContent(new Uint8Array(content));

  return documents;
};
The getIndexFromStore the function loads the vector index from the external Qdrant store.
When you import
llamaindexin a non-Node.js environment (such as React Server Components, Cloudflare Workers, etc.) Some classes are not exported from top-level entry file.
So we have to import the QdrantVectorStore library directly at the top of the file.
// lib/ai-engine/vector-index.ts

import { serviceContextFromDefaults, VectorStoreIndex } from "llamaindex";
import { QdrantVectorStore } from "llamaindex/vector-store/QdrantVectorStore";
import { CHUNK_OVERLAP, CHUNK_SIZE } from "./config";

export const getIndexFromStore = async (): Promise<VectorStoreIndex> => {
  const vectorStore = new QdrantVectorStore({
    apiKey: process.env.QDRANT_API_KEY,
    url: process.env.QDRANT_URL,
    collectionName: "document-collection",
  });

  const serviceContext = serviceContextFromDefaults({
    chunkSize: CHUNK_SIZE,
    chunkOverlap: CHUNK_OVERLAP,
  });

  const vectorStoreIndex = await VectorStoreIndex.fromVectorStore(vectorStore, serviceContext);

  return vectorStoreIndex;
};
Now that we have all the components for generating and storing embeddings, let's integrate them in the router file.
// app/api/upload/route.ts
...
export const fileRouter: UploadThingFileRouter = {
  fileUploader: f({ pdf: { maxFileSize: "4MB" } }).onUploadComplete(async ({ file }) => {
    try {
      const documents = await getDocuments(file.url);

      const index = await getIndexFromStore();

      for (const document of documents) {
        await index.insert(document);
      }

      return {
        success: true,
        url: file.url,
      };
    } catch (error) {
      console.error(error);
      return {
        success: false,
        message: "Failed to process file",
      };
    }
  }),
};
...
From now on, when you upload a new file from the front end, it will also automatically add the embeddings to the Qdrant database.
💡 The embedding generation uses OpenAI under the hood, be aware of their pricing strategy.Chat with the document store
Our application is ready to use for Q&A in the front end. Let's implement the chat components and the backend part of the chat functionality.
Chat API
For the chat functionality, we use Vercel’s AI npm package, which provides a ton of useful methods to create a chat API with streaming.
npm install aiThe chat and vector store-related modules are collected in the ai-engine folder, so let's extend the folder with a new file. The exported method converts the vector index to the chat engine using llamaindex object methods. The LlamaIndex asRetriever method creates a retriever object from the vector index. This retriever is used to fetch relevant documents from the index based on the user's query. The similarityTopK parameter is set to 5, meaning it will retrieve the top 5 most similar documents. The chatEngine is then initialized with this retriever and the provided chat history, enabling contextual responses to user queries.
// lib/ai-engine/chat.ts

import { ChatMessage, ContextChatEngine } from "llamaindex";
import { getIndexFromStore } from "./vector-index";

type Props = {
  chatHistory?: ChatMessage[];
};

export const getChatEngine = async ({ chatHistory }: Props): Promise<ContextChatEngine> => {
  const index = await getIndexFromStore();

  const retriever = index.asRetriever({
    similarityTopK: 5,
  });

  const chatEngine = new ContextChatEngine({ retriever, chatHistory });

  return chatEngine;
};
Now let's create the chat API that is exposed to the client and makes it possible to send questions to the backend.
// app/api/chat/route.ts

import { NextRequest, NextResponse } from "next/server";

const chat = async (request: NextRequest) => {
  const body = await request.json();
};

export const POST = chat;
First, we need to parse the input parameters and return an error status if an exception occurs. To achieve this, we use a zod schema definition to validate the request body.
// app/api/chat/schema.ts

import { z } from "zod";

const messageSchema = z.object({
  content: z.string(),
  role: z.enum(["user", "assistant", "system", "memory"]),
});

export const bodySchema = z.object({
  messages: z.array(messageSchema),
});

export type Message = z.infer<typeof messageSchema>;
Let's update the route file with schema validation and integrate the chat engine module we implemented earlier. The message array contains all messages in the given thread, which we provide to the engine as history, except for the last user's most recent message.
This approach ensures the chat engine has the context to provide relevant and coherent responses. After processing the messages, we can use the chat engine to generate a response based on the user’s latest query. The chat engine uses the vector index we created earlier, which contains embeddings of the uploaded documents, allowing it to provide informed answers from the stored knowledge base.
// app/api/chat/route.ts

import { NextRequest, NextResponse } from "next/server";
import { getChatEngine } from "@/lib/ai-engine";

import { bodySchema, Message } from "./schema";

const isMessageFromUser = (message: Message | undefined): message is Message & { role: "user" } =>
  message?.role === "user";

const chat = async (request: NextRequest) => {
   try {
    const body = await request.json();
    const { messages } = bodySchema.parse(body);
    const lastMessage = messages.pop();

    if (!isMessageFromUser(lastMessage)) {
      return NextResponse.json(
        {
          error: "Last message must be from user",
        },
        { status: 400 }
      );
    }

    const chatEngine = await getChatEngine({ chatHistory: messages });

    const chatResponse = await chatEngine.chat({
      message: lastMessage.content,
      stream: true,
    });

  } catch (error) {
    console.error(error);
    return NextResponse.json(
      {
        error: (error as Error).message,
      },
      { status: 500 }
    );
  }
};

export const POST = chat;
As you can see, we use the chat method with the stream: true parameter. This parameter enables the method to return an AsyncIterable. However, this format isn't suitable for our needs, so we'll create a transformer to convert the AsyncIterable into a ReadableStream.
// app/api/chat/iteratorToStream.ts

import {
  AIStreamCallbacksAndOptions,
  createCallbacksTransformer,
  createStreamDataTransformer,
  trimStartOfStreamHelper,
} from "ai";
import { EngineResponse } from "llamaindex";

export const iteratorToStream = <T extends EngineResponse>(
  iterator: AsyncIterable<T>,
  opts?: {
    callbacks?: AIStreamCallbacksAndOptions;
  }
): ReadableStream<string> => {
  const reader = iterator[Symbol.asyncIterator]();
  const trimStartOfStream = trimStartOfStreamHelper();

  return new ReadableStream<string>({
    async pull(controller) {
      try {
        const { done, value } = await reader.next();
        if (done) {
          controller.close();
          return;
        }

        let message: string;
        if (typeof value.message.content === "string") {
          message = trimStartOfStream(value.message.content);
        } else {
          message = trimStartOfStream(value.response ?? "");
        }
        controller.enqueue(message);
      } catch (error) {
        controller.error(error);
      }
    },
  })
    .pipeThrough(createCallbacksTransformer(opts?.callbacks))
    .pipeThrough(createStreamDataTransformer());
};
And finally, use the transformer in the route file and reply to the user with a chat stream. This allows us to show the newly created chat content similarly to ChatGPT and other chat platforms, loading the response content chunk by chunk.
...
import { iteratorToStream } from "./iteratorToStream";
...
const chat = async (request: NextRequest) => {
try {
...
return new Response(iteratorToStream(chatResponse), {
headers: { "Content-Type": "text/html; charset=utf-8" },
});
} catch (error) {
console.error(error);
return NextResponse.json(
{
error: (error as Error).message,
},
{ status: 500 }
);
}
};
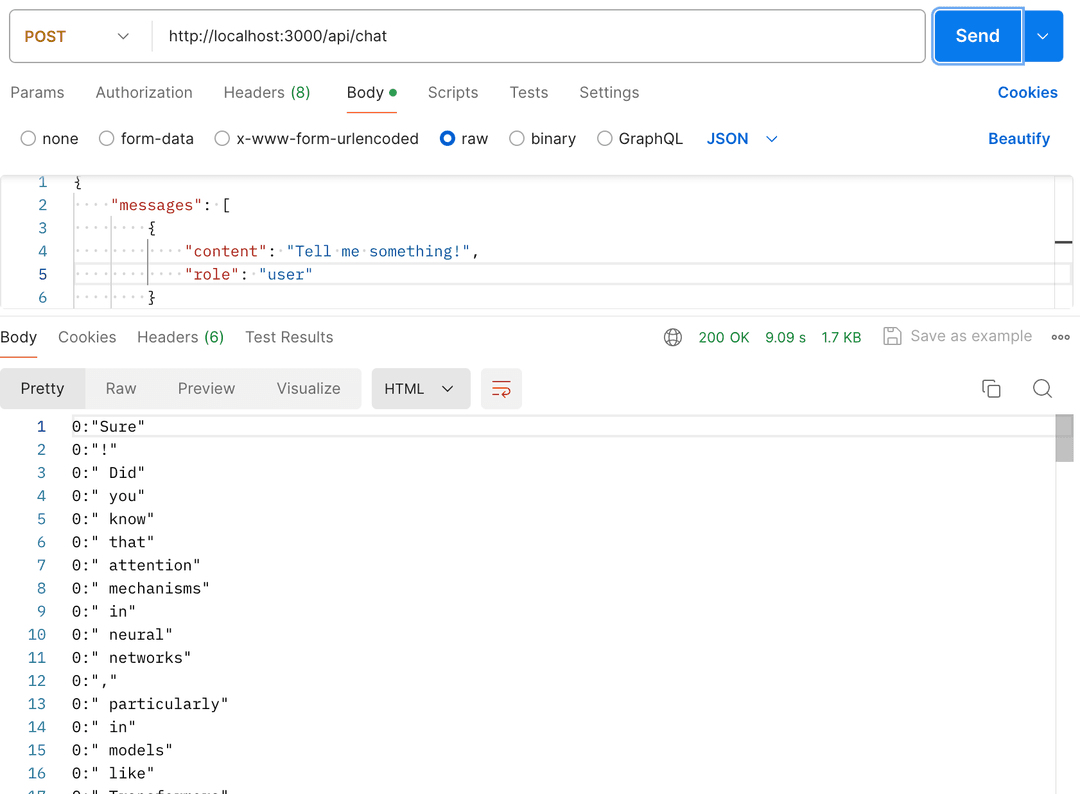
...We're now ready to use our chat API. With our chat engine built on the vector index containing uploaded document embeddings, the chat can respond using information from these documents. You can test the chat API using Postman — simply send a message, and you'll receive the response as a stream.
Chat frontend components
In the last section, we build a simple UI for the chat with Shadcn UI. Install the package and then add a button component to the project.
npx shadcn@latest init
npx shadcn@latest add button input
The chat components are quite straightforward, we need a layout to show the messages and we need an input field to add new messages. To achieve the seamless integration with our backend, we use the useChat hook of the ai library.
This hook provides an easy way to manage the chat state and handle interactions with the backend API. It takes care of sending messages, receiving responses, and updating the UI accordingly. By using the useChat hook, we can easily implement real-time chat functionality without having to manually manage the state and API calls.
// components/chat.tsx

"use client";

import { useChat } from "ai/react";

import { BoxLayout } from "./ui/box-layout";
import { ChatInput } from "./ui/chat-input";
import { ChatMessages } from "./ui/chat-messages";

export default function Chat() {
  const { messages, input, isLoading, handleSubmit, handleInputChange } = useChat({
    api: process.env.NEXT_PUBLIC_CHAT_API,
    headers: {
      "Content-Type": "application/json", // using JSON because of vercel/ai 2.2.26
    },
  });

  return (
    <BoxLayout>
      <ChatMessages messages={messages} isLoading={isLoading} />
      <ChatInput
        input={input}
        handleInputChange={handleInputChange}
        isLoading={isLoading}
        handleSubmit={handleSubmit}
      />
    </BoxLayout>
  );
}
The ChatInput component contains an input field and a button that triggers the submit action. The button and the input are the original shadcn UI components.
// components/ui/chat-input.tsx

import { Button } from "./button";
import { Input } from "./input";

type Props = {
  input: string;
  isLoading: boolean;
  handleInputChange: (event: React.ChangeEvent<HTMLInputElement>) => void;
  handleSubmit: (e: React.FormEvent<HTMLFormElement>) => void;
};

export const ChatInput: React.FC<Props> = (props) => (
  <form onSubmit={props.handleSubmit}>
    <div className="flex w-full items-start justify-between gap-4">
      <Input
        name="message"
        placeholder="Type a message"
        value={props.input}
        onChange={props.handleInputChange}
        autoFocus
      />

      <Button type="submit" disabled={props.isLoading}>
        Send message
      </Button>
    </div>
  </form>
);
The ChatMessages component renders the messages array in Markdown fields to expose the styling of the response messages.
// components/ui/chat-messages.tsx
import { Message } from "ai";
import { useEffect, useRef } from "react";
import { Loader2 } from "lucide-react";
import { Markdown } from "./markdown";
type Props = {
messages: Message[];
isLoading: boolean;
};
export const ChatMessages = (props: Props) => {
const scrollableChatContainerRef = useRef<HTMLDivElement>(null);
const messageLength = props.messages.length;
const lastMessage = props.messages[messageLength - 1];
const scrollToBottom = () => {
if (scrollableChatContainerRef.current) {
scrollableChatContainerRef.current.scrollTop = scrollableChatContainerRef.current.scrollHeight;
}
};
const isLastMessageFromAssistant = messageLength > 0 && lastMessage?.role !== "user";
// `isPending` indicate
// that stream response is not yet received from the server,
// so we show a loading indicator to give a better UX.
const isPending = props.isLoading && !isLastMessageFromAssistant;
useEffect(() => {
scrollToBottom();
}, [messageLength, lastMessage]);
return (
<div className="flex h-[50vh] flex-col gap-5 divide-y overflow-y-auto pb-4" ref={scrollableChatContainerRef}>
{props.messages.map((message) => (
<div key={message.id} className="flex-1 space-y-4">
<Markdown>{message.content}</Markdown>
</div>
))}
{isPending && (
<div className="flex justify-center items-center pt-10">
<Loader2 className="h-4 w-4 animate-spin" />
</div>
)}
</div>
);
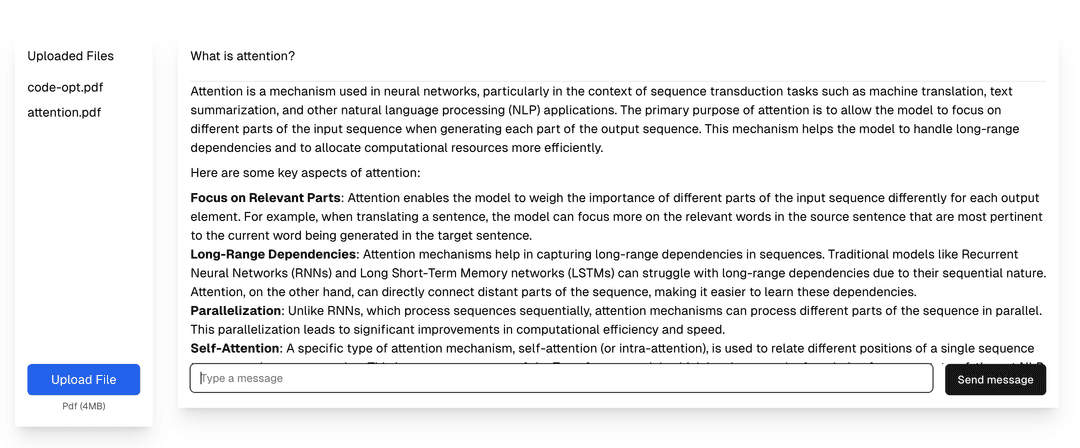
};Now we have everything to start our basic chat application, upload files, and ask questions about anything including the files you uploaded.
Final thoughts
In this article, we’ve explored the process of building a file Q&A AI application using NextJS, UploadThing, LlamaIndex, and Qdrant. We’ve covered the essential steps from setting up the project to implementing the chat functionality, both on the backend and front end. This application demonstrates the power of combining modern web technologies with AI capabilities to create a secure and efficient document querying system. As we move forward, numerous possibilities exist for extending and enhancing this application, such as improving the UI, adding more advanced search features, or integrating with other AI models.